Widget Advanced Customization#
The Quarter4 widgets can be customized using the handlebar.js template language. This allows full control over appearance, layout, design and interactions. Templates can support full CSS and JavaScript along with any additional CSS or JavaScript libraries.
Tip
For full details on the template language see the Handlebars Language Guide.
The following document outline the advanced customization of templates after they have been copied from the Quarter4 O.D.D.S dashboard. For more information see Embedding Widgets.
Including Templates in a Web Site#
Customizing the widget output using templates requires a few steps.
- Copy the widget embed code from the Quarter4 O.D.D.S. Dashboard into the website source code.
- Add a template
<script>block to build the template. - Alter the widget attributes to identify which template to use.
To begin, start by copying the regular embed code for the widget as described here. For example, here is a pre-game team event widget that shows the next game for a team (or the last game if there is no next game). The embed code would look similar to this:
<!-- Default widget embed code copied from dashboard -->
<blockquote
    class="q4-team-current-event"
    data-sport="american-football"
    data-q4="ff952860-0638-4c8b-9db5-39ac11152f8b"
>
    <p lang="en" dir="ltr">The static widget content.</p>
</blockquote>
<script src="https://api.quarter4.io/american-football/widget/embed/XXXXXXXX-XXXX-XXXX-XXXX-XXXXXXXXXXXX/v1.js" charset="utf-8"></script>
Note
The copied code will contain a widget script url unique to your account.
Without modification, this will render the default Quarter4 widget using a remote <iframe> source and very minimal styling, for example:
Example Widget.
Next, create a template (or reuse an existing template):
- Create a
<script>element in the source code of the page where the widget is embedded. - Give the script element a unique
id. This can be anything. - Add a
data-template-idattribute to the widget element copied from the O.D.D.S. dashboard. - Set the
data-template-idvalue to the new script's id created above.
For example, here the sample includes an script with an id of example-event-template that will be used as the template for the widget:
<!-- Modified widget embed code to add template in data-template-id -->
<blockquote
    class="q4-team-current-event"
    data-sport="american-football"
    data-q4="ff952860-0638-4c8b-9db5-39ac11152f8b"
    data-template-id="example-event-template"
>
    <p lang="en" dir="ltr">The static widget content.</p>
</blockquote>
<script src="https://api.quarter4.io/american-football/widget/embed/XXXXXXXX-XXXX-XXXX-XXXX-XXXXXXXXXXXX/v1.js" charset="utf-8"></script>

<!-- template container -->
<script id='example-event-template' type='text/x-handlebars-template'>
    <!-- template layout code (see below) -->
</script>
The script element must have the text/x-handlebars-template type to indicate it is a handlebars.js template. The Quarter4 widget engine will then use the data-template-id attribute to locate the template and load it into the widget layout process. The same template can be used for multiple widget instances.
If a template applies to several widget instances, for example every event widget, special ids can be used to automatically apply a template to a widget without specifying an unique id each time. The Q4 widget engine will look for templates in the following order:
- The id specified in
data-template-id, ifdata-template-idis specified but the template is not found, no widget will be rendered. - A UUID specific template with an id of
q4-{uuid}-templatewhere{uuid}is replaced with the UUID value in the widget'sdata-q4attribute. For example:q4-ff952860-0638-4c8b-9db5-39ac11152f8b-template. - A sport/type specific template with the id
q4-{sport}-{type}-template, where{sport}is replaced with the sport and the{type}is replaced with the type related to the widget. For exampleq4-american-football-event-template.- Sport can be one of
american-football,basketball,hockey. - Type can be one of:
eventfor all event matchup widgets,performancefor all player performance widgets,event-performancefor all multiple players in an event widgets,rankfor all the season seeding widgets,player-effectfor all the player effect widgets.
- Sport can be one of
- A type specific template with the id
q4-{type}-template, where{type}is replaced with the type related to the widget. For exampleq4-event-template.- The type can be one of same as above.
Lastly, create the template layout code using handlebars as follows.
Creating the Template Layout Code#
The Quarter4 Widgets use handlebar.js templates. All the built in methods and features Handlebars templates can be used to layout the widget content. For full details see the handlebars language guide.
The template will be rendered with the context of a JSON data object provided by the widget. Each widget type (game, player, rank, etc.) will have a different set of properties to access so a custom templates will need to be built for specific each widget type.
Tip
For a full list of properties, see the JSON examples below.
Here is an example of an event widget with a basic layout showing the two teams and their predictions in a table:
<script id='example-event-template' type='text/x-handlebars-template'>
 <style type="text/css">
    .wrapper {
      background: #efefef;
      box-shadow: 0px 1px 3px rgba(63, 63, 68, 0.15);
      border-radius: 10px;
      padding:10px;
      margin:0;
      overflow: hidden;
      font-size: 12px;
    }
    .wrapper h1 {
      font-style: bold;
      font-size: 16px;
      margin: 5px;
    }
    .wrapper table {
      width: 100%;
    }
    .wrapper th {
      font-style: bold;
      text-align: center;
      padding: 5px;
      color: blue;
    }
    .wrapper th:first-of-type {
      font-style: bold;
    }
    .wrapper td {
      padding: 10px;
    }
  </style>
  <div class='wrapper '>
    <h1>Custom Game Prediction Template</h1>
    <p>It's not very pretty but now you can style it however you like.</p>
    <p>You can add whatever content you like to the handlebars.js template such as <a href="http://example.com" target="_blank">Links</a> or additional scripts to make the widget more interactive with your web site.</p>
    {{! Show detail if available }}
    {{#if detail}}
    <table>
      <thead>
      <tr>
        {{! hard coded column headers to customize as needed }}
        <th>The Teams</th>
        <th>Win?</th>
        <th>Spread</th>
        <th>Over/Under</th>
      </tr>
      </thead>
      <tbody>
      {{! loop over each row in the result }}
      {{#each detail.rows}}
      <tr>
        <td>
          {{! for index 0, include the away team image, for index 1 the home team. }}
          {{#compare @index '==' 0}}
          Away: {{../teams.away.abbreviation}}
          {{/compare}}
          {{#compare @index '==' 1}}
          Home: {{../teams.home.abbreviation}}
          {{/compare}}
        </td>
        {{#each this}}
          {{! Show each column, skipping the first since the logo was already added }}
          {{#compare @index '>' 0}}
          <td>{{this}}</td>
          {{/compare}}
        {{/each}}
      </tr>
      {{/each}}
      </tbody>
    </table>
    {{/if}}
  </div>
</script>
This template is rendered using the event widget's json data as a context, for example:
{
  "teams": {
    "home": {
      "abbreviation": "SEA"
    },
    "away": {
      "abbreviation": "TEN"
    }
  },
  "title": "Tennessee Titans at Seattle Seahawks",
  "body": "The Seattle Seahawks have a forecast 56% chance to win against The Tennessee Titans with a spread of -8/8 and an over/under of 53.",
  "time": "4:05pm EDT",
  "date": "Sunday, June 26th",
  "detail": {
    "header": [
      "",
      "Predicted Win/Loss",
      "Predicted Spread",
      "Predicted Game O/U"
    ],
    "rows": [
      [
        "Tennessee Titans",
        "44%",
        8,
        53
      ],
      [
        "Seattle Seahawks",
        "56%",
        -8,
        53
      ]
    ]
  },
  "powered": false,
  "theme": null,
  "colourTableBottom": "#afafaf",
  "colourTableHead": "#afafaf",
  "colourRowBottom": "#efefef",
  "colourFrame": "#d7d7d7",
  "timestamp": 1656273900
}
The above template will replace the original blockquote from the copied embed code with the following content:
<!-- your website html code here -->

<iframe
  seamless="seamless"
  sandbox="allow-same-origin allow-scripts allow-modals"
  id="...random id..."
  srcdoc="...soource code..."
>
<!DOCTYPE html>
    <html>
    <body>
        <!-- jquery is included by default -->
        <script src="https://cdn.jsdelivr.net/npm/jquery@3.6.0/dist/jquery.min.js" crossorigin="anonymous"></script>
        <!-- rendered template start -->
        <style type="text/css">
          .wrapper {
            background: #efefef;
            box-shadow: 0px 1px 3px rgba(63, 63, 68, 0.15);
            border-radius: 10px;
            padding:10px;
            margin:0;
            overflow: hidden;
            font-size: 12px;
          }
          .wrapper h1 {
            font-style: bold;
            font-size: 16px;
            margin: 5px;
          }
          .wrapper table {
            width: 100%;
          }
          .wrapper th {
            font-style: bold;
            text-align: center;
            padding: 5px;
            color: blue;
          }
          .wrapper th:first-of-type {
            font-style: bold;
          }
          .wrapper td {
            padding: 10px;
          }
        </style>
        <div class='wrapper '>
            <h1>Custom Game Prediction Template</h1>
            <p>It's not very pretty but can be styled multiple ways.</p>
            <p>You can add whatever content you like to the handlebars.js template such as <a href="http://example.com" target="_blank">Links</a> or additional scripts to make the widget more interactive with your web site.</p>
            <table>
                <thead>
                <tr>
                    <th>Matchup</th>
                    <th>Probability</th>
                    <th>Spread</th>
                    <th>Total</th>
                </tr>
                </thead>
                <tbody>
                <tr>
                    <td>Away: TEN</td>
                    <td>44%</td>
                    <td>8</td>
                    <td>53</td>
                </tr>
                <tr>
                    <td>Home: SEA</td>
                    <td>56%</td>
                    <td>-8</td>
                    <td>53</td>
                </tr>
                </tbody>
            </table>
        </div>
        <!-- rendered template end -->
        <div style="clear: both; display: block; height: 0px;"></div>
        <script type="application/javascript">
            // additional widget engine related scripts
        </script>
    </body>
</html>
</iframe>

<!-- website html code here -->
which will produce the following (not very pretty) rendered output:
Example Widget.
Examining the above example, there are a few things to note.
Embedding External Files#
In the previous example the CSS style was included directly in the template. Instead, external stylesheets can also be included in the template using a regular <link> element such as:
<link href='stylesheet.css' rel="stylesheet" type="text/css" />
The template is rendered in a sandboxed iframe in the html document so stylesheet urls are relative to the path of the page that includes the widget. An absolute url can be used if the relative path changes or if the files have a common resource location such as a CDN. For example to include bootstrap in the template, use:
<link href="https://cdn.jsdelivr.net/npm/bootstrap@5.0.2/dist/css/bootstrap.min.css" rel="stylesheet">
A <script> element can also be included but, due to the nature of HTML, a <script> element can not be placed inside another <script> so it must be escaped in the template using {{!}} as follows:
<{{!}}script src="lib.js"><{{!}}/script>
This will prevent errors in the handlebars rendering engine but will render the element properly in the resulting template as:
<script src="lib.js"></script>
Note
The source generated by the widget engine will create an iframe using sandbox mode and the srcdoc attribute to specify the content. In addition to the rendered template, some additional scripts are included to automatically resize the iframe and allow the widget engine to work properly.
Handlebars.js Expressions and Helpers#
The Handlebars templates rely on expressions to render the content into the template. These can be simple expressions that will place the content into the template markup or more complex block expressions that provide basic logic. For example:
<p>{{name}}</p>
which, given {"name":"Hayden"} as the context, will render <p>Hayde</p>.
More advanced block helpers with basic login such as:
<ul>
{{#each listitems}}
    <li>{{this}}</li>
{{/each}}
</ul>
will render lists of content or perform basic comparisons.
Note
For full details and examples of the Handlebars.js template language see the Handlebars Language Guide.
To help specifically with Quarter4 widgets, a few custom handlebars helpers are available by default. These include:
winloss– returns a value ofwinif the input number is > 50,lossif it's < 50.capitalize- capitalize the first character.upper- capitalize all characters.-
compare- a block helper that executes the content if the comparison is true. Example:Allowed comparisons include:{{#each detail.rows}} {{#compare @index '==' 0}} This is the item at index 0 {{/compare}} {{/each}} -
==- equals ===- equals with type!=- does not equal!==- does not equal with type<- Less than<=- Less than or equal to>- Greater than>=- Greater than or equal to&&- and-
||- or -
replace- a block helper that executes the content if the comparison is true. Example:Replace output will be{{#replace 'foo' 'bar'}} Content with foo. {{/replace}}Content with bar.
Handlebars.js Expressions and Helpers#
To register custom Handlebars helpers to use in templates, define a window.Q4_REGISTER_HELPERS variable before loading the widget embed script. The widget engine will check for the existence of this variable and register the helpers with Handlebars. The object must define the name of the helper and the callback method. For example, here we define a helper called inspect that passes the value to the console log:
window.Q4_REGISTER_HELPERS = {
    'inspect': function(value) {
        console.debug('inspected value:',value);
    }
}
In order for the widget engine to detect the helpers, the variable must be defined before the embed script loads, for example:
<script>
window.Q4_REGISTER_HELPERS = {
    'inspect': function(value) {
        console.debug('inspected value:',value);
    }
}
</script>

<blockquote
    class="q4-team-current-event"
    data-sport="american-football"
    data-q4="ff952860-0638-4c8b-9db5-39ac11152f8b"
    data-template-id="example-event-template"
>
    <p lang="en" dir="ltr">The static widget content.</p>
</blockquote>

<!-- define helpers before this script is loaded -->
<script src="https://api.quarter.io/american-football/widget/embed/XXXXXXXX-XXXX-XXXX-XXXX-XXXXXXXXXXXX/v1.js" charset="utf-8"></script>
Then the helper can be used in the template during rendering:
<script id='example-event-template' type='text/x-handlebars-template'>
    {{inspect this}}
</script>
When the above example renders, the entire context in this will be logged to the web browser's console (useful for inspecting what items are available!)
Helpers can also return a value to be output in the template at that location. See the Handlebars Helpers for more information and examples on creating and using helpers.
If the widget script has already loaded and you need to dynamically register a helper, you can use the window.q4.handlebars.registerHelper method as well, for example:
<script>
  document.addEventListener("DOMContentLoaded", (event) => {
    window.q4.handlebars.registerHelper("round", function (val, decimals) {
      return parseFloat(val).toFixed(decimals);
    });
  });
</script>
Scripting Events#
Templates support regular JavaScript events. Events can be added using:
- regular JavaScript,
- an included library such as jQuery,
- or special built-in classes.
For quick click actions, elements with the class clickable and a data attribute of data-clickable will trigger a parent window message event. For example:
<div class="clickable" data-clickable="Unlock Me">Unlock</div>
Clicking the div will cause the parent window to receive a message event with a data.message attribute containing the content of the related data-clickable attribute. The parent window must include a listener such as:
<!-- in parent window -->
<script>
  window.addEventListener("message", (event) => {
    if (event.data && event.data.sender) {
      console.log(event.data.message)
      if (event.data.message == "Unlock Me") {
        // Do something after clicking Unlock.
      }
    }
  });
</script>
Example Data Contexts#
The following are example JSON contexts using American Football for the various widget types that are available to the templates:
| Widget Type | Example JSON Context |
|---|---|
q4-event |
View |
q4-event-players |
View |
q4-event-players filtered to receiving |
View |
q4-team-current-event |
View |
q4-team-current-event-players |
View |
q4-performance |
View |
q4-player-current-performance |
View |
q4-rank |
View |
Contract Templates and O.D.D.S Dashboard Integration#
Custom templates must live on the website where the code snippet is to be embedded so it is up to the content editor to ensure they exist on the page.
In the case where Quarter4 has been contracted to develop templates on behalf of a client, those templates will be available for selection in the O.D.D.S Dashboard. To locate these templates, navigate to the widget embed screen and the related templates for that widget will be available in the widget embed dialog box. Selecting one of the templates will include the templates code in the copy/paste area as well as provide a preview of the custom template applied to the selected widget.
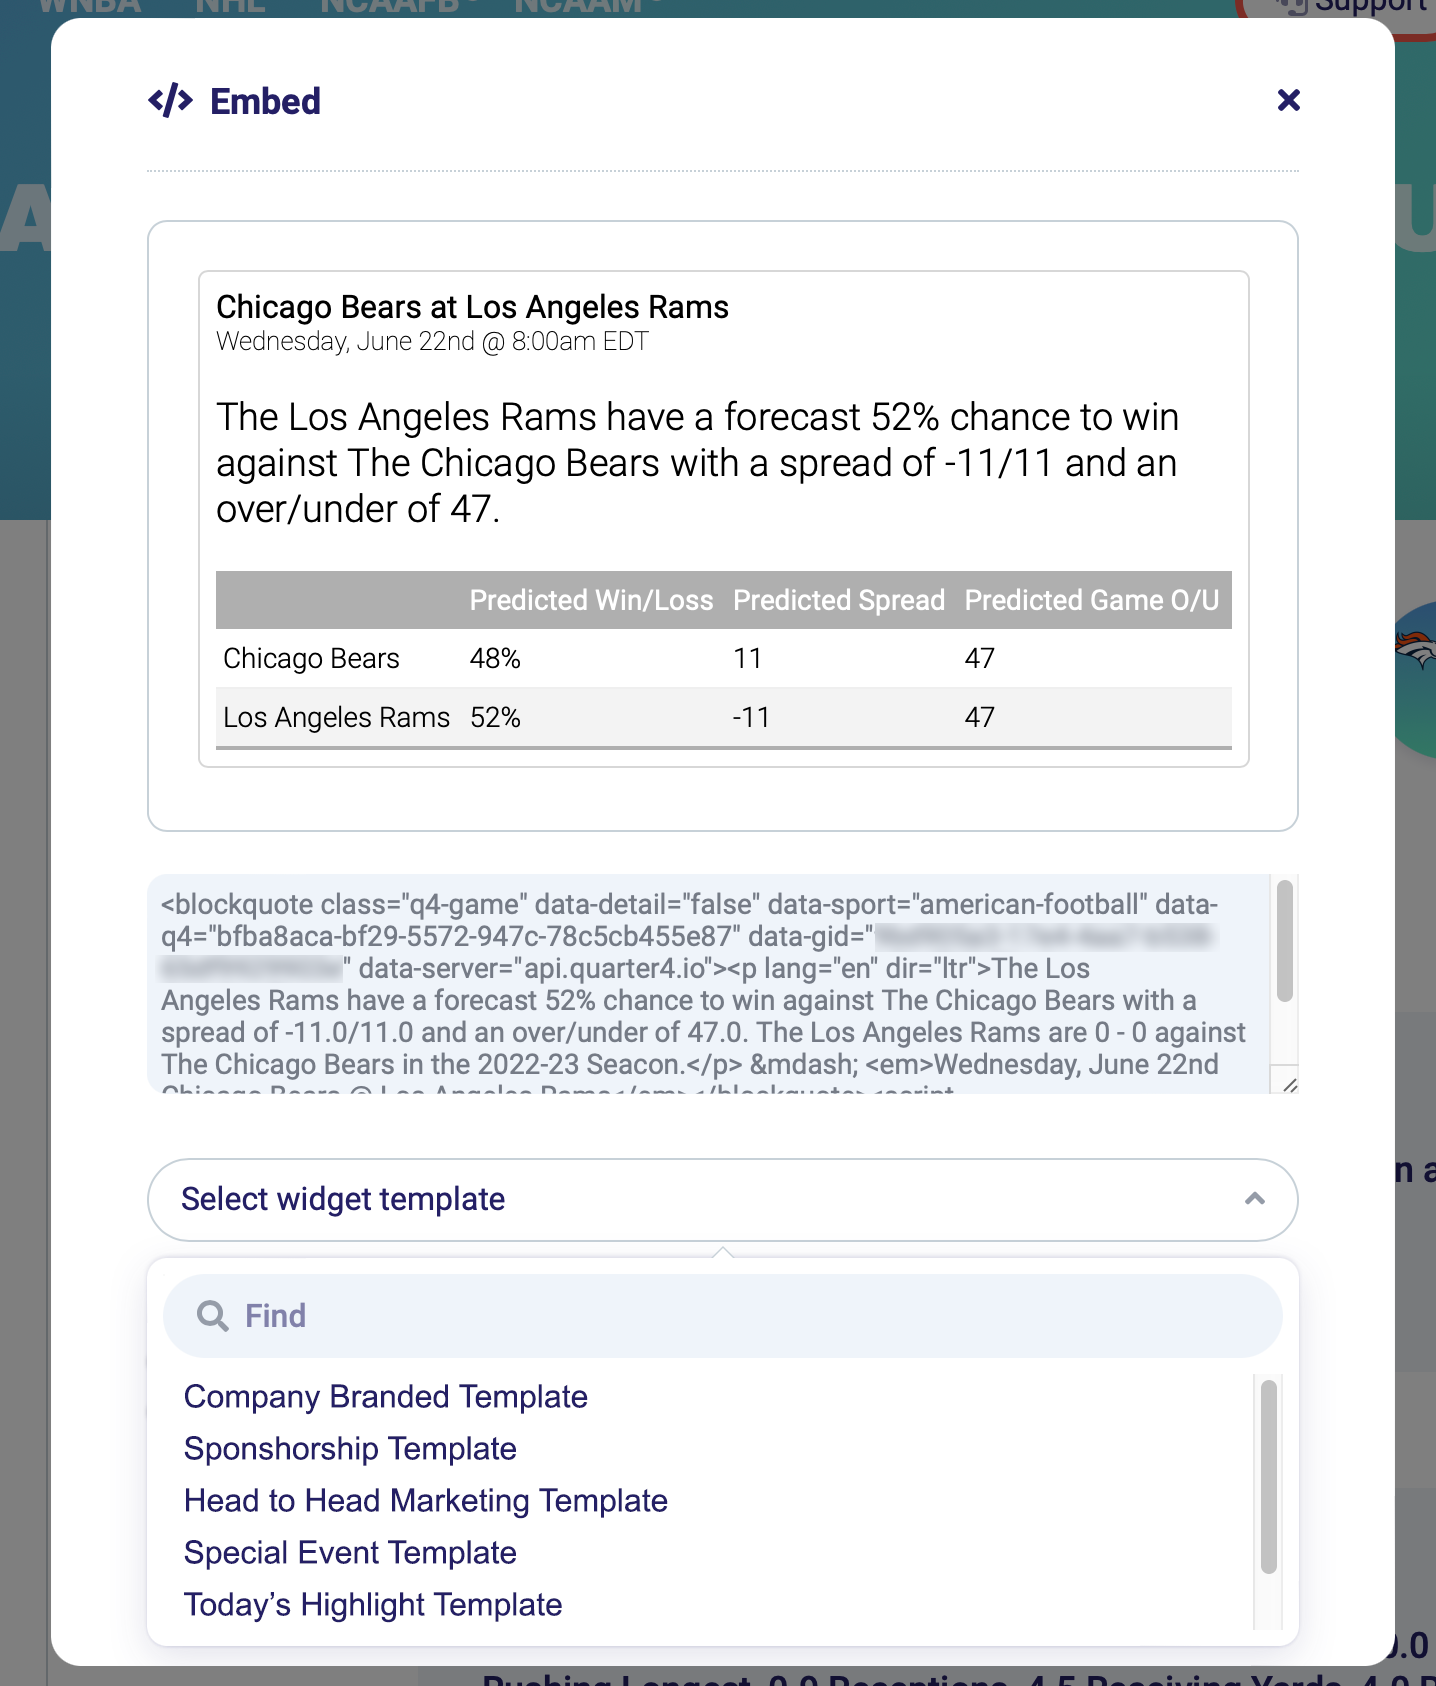
A best effort will be made to preview the custom template in the widget embed dialog. In some cases, customized templates may include advanced functions and scripts that will only work properly in the context of the proper parent website. In those cases, it may be necessary to copy and paste the embed code into the website to ensure proper rending of all the interactive features.